Can Alexa control X10 devices?

- By: Ashley Saunders | Amazon Alexa
- PUBLISHED: 13th September 2022 | LAST UPDATE: 13th January 2023
X10 is the original home automation system. While the technology is over 40 years old, some people are still using X10 devices. With the introduction of voice assistants, you might wonder; can Alexa control X10 devices?
If you’ve been using X10 hardware for years, you might be reluctant to change it. If it ain’t broke, why chance it?! Not to mention the cost of upgrading to more modern technology like Z-Wave or Zigbee can be prohibitive.
After all, X10 offers the same basic functionality as modern technology, including turning your lights on and off and controlling devices plugged into the mains.
So, can Alexa control X10 devices? Yes, but it does involve following a few complicated steps. Thankfully, these instructions also work for the Google Assistant, but more on that later.
#1 You Need a Computer
To integrate X10 and Alexa, you’ll need a computer with a serial port. Any computer will do, as long as it has a serial port. Next, you need an X10 CM17A firecracker module, which you can buy for around £15 on eBay and other places.
You’ll also need a receiver. The best option is the X10 TM751 module, which listens for radio signals (such as those from the firecracker module) and injects those signals onto the electrical circuits running through the house.
Of course, you need some X10 devices to control, such as in-wall switches, inline appliance modules and lamp modules throughout my house.
The integration process is slightly different if you’re using Microsoft Windows or Linux. The following steps will cover how to use Linux, as it tends to be more reliably.
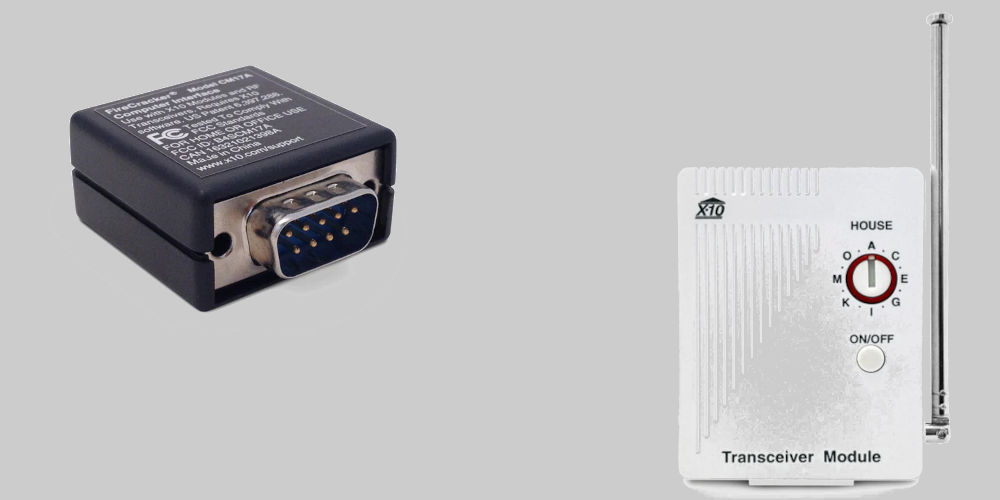
photos by X10
#2 Configuring your firecrackers with Linux Bottlerocket
The CM17A ‘Firecracker’ module can be operated via command line with a Linux application called Bottlerocket. The module converts commands into wireless signals, which are picked up by the transceiver modules.
Here’s what a command looks like:
br –port /dev/ttyS0 –house=B –on 4
Don’t worry if this looks confusing as it’s quite simple to understand!
br: Executable Bottlerocket application
–port /dev/ttyS0: Tells Bottlerocket which serial port to use
–house=B: Tells Bottlerocket which house code you’re on
–on 4: Tells Bottlerocket to send the ‘on’ command for unit code 4.
For example, if the previous command turns your living room light on. You can save the command as a file called “LivingRoomLightON”. Next, in a terminal session, run this command: Chmod +x LivingRoomLightON as this command makes the script file you just created executable.
But first, ensures it works by (while still in a terminal session) running: ./LivingRoomLightON. Your living room light should turn on, assuming that /dev/ttyS0 is the serial port that the firecracker is installed on.
At this point, you can create and test scripts for each device in your home. So, if you are successful at this point, you’re not too far from being able to use your Amazon Echo to control your lighting. Otherwise, you need to do some troubleshooting.
If you were to stop here, you’d still have a pretty powerful setup using just a Linux server and the Bottlerocket software. It doesn’t require that much additional effort to set up cron jobs to automatically turn lights on and off.
Cron jobs are highly flexible. For example, you can set a job per month. So, you can set the lights to come on around sunset and sunrise, with a new job for each new month.
#3 We need a bridge!
There’s one final missing piece that will enable us to get X10 and Alexa to communicate. We need a conduit, thankfully BWS Systems has released an excellent piece of software that sits between your home automation server and your Amazon Echo device.
Called the HA Bridge, you can download it from GitHub. With it downloaded and installed, you’ll see a blank screen when you load the HA Bridge for the first time.
Click on Manual Add to view the new device entry screen. First, name the device and hit save. Under Device Type, drop down the list and choose Execute Script/Program.
The On URL is the script that will run to turn this light on. For example, the working script looks like: /home/myself/LivingRoomLightsOn.
You can also programme the reverse script or Off URL, which will run to turn this light off. An example is: /home/myself/LivingRoomLightsOff.
Click Add Bridge Device to add this to the list of devices. You should now see this when you click Bridge Devices. Click Bridge Devices and click Test On or Test Off.
If everything is configured correctly, the HA Bridge should execute the scripts for On and Off after you click the corresponding button.

#4 Getting Alexa working
After testing the system, you should be able to have your Echo scan for new devices. You can do that by saying, “Alexa, scan for devices”, or using Amazon’s webUI. At this point, Alexa should be able to turn your lights on and off! Magic!
You will need to launch the .jar file each time you boot the server. Here’s the easiest way to do that.
- Open a text editor and paste the following into a new document: cd /home/myself/Lighting /usr/bin/nohup /usr/lib/jvm/java-1.8.0-openjdk-amd64/bin/java -jar ha-bridge-3.2.2.jar
- Save this new document as starthabridge.sh
- Make this new script executable by issuing this command in a terminal session: chmod +x starthabridge.sh
- Tell the system to launch it at each boot by using the command (again in a terminal session): sudo crontab -e
- From here you can schedule tasks to run automatically, or, in this case, tell the system to run a command at boot.
- You should add to the end of your cron to get the Home Automation Bridge to launch at startup: @reboot /home/myself/Lighting/starthabridge.sh
#5 Enjoy Alexa control over your X10 devices
You should have a working system! You can get the same thing going with Microsoft Windows using the same .jar file from bws systems and a command line utility for Windows called cm17a.exe.
The syntax is different (check the GitHub page for usage). Plus, it is slower to issue the commands. For example, asking Alexa to turn on the Living Room lights with Windows, results in a good 2-second delay between Alexa saying, “Okay” and the lights coming on.
With Linux, the lights come on before she even has a chance to say “Okay”.

So, can Alexa control X10 devices?
While it might be complicated to integrate Alexa and your X10 devices, it is possible. If you prefer to use the Google Assistant, you need a similar set up and some time to tweak the command line scripts.
Whether you use Alexa or the Google Assistant, you will need to do some research and spend time experimenting. So, can Alexa control X10 devices? Yes, but it’s not straightforward.