Creating Fibaro Block Scenes for Home Center 3 and 3 Lite
- By: Ashley Saunders | Fibaro
- PUBLISHED: 9th May 2023 | LAST UPDATE: 26th January 2024
If you have a Fibaro Home Center 3 or 3 Lite (sometimes known as the Yubii Home), before long you’ll want to experiment with scenes to allow you to automate or control multiple devices. We have two types available Fibaro Block Scenes and LUA Scenes.
Block Scenes use drag and drop logic, and so are far easier to programme. Building LUA Scene, on the other hand, involves LUA coding. Not a task for the faint-hearted or easily bored! We’d suggest staying away from LUA Scenes at the start.
Let’s explore the ins and outs of Fibaro Block Scenes, including how to build them, what we can use them for, and how to activate them once programmed.
Why use Fibaro Block Scenes with your smart home system?
There are unlimited ways you can use block scenes. You could start with the classic “movie night” scene, which dims the living room’s light, lowers the blinds, and turns the TV on.
Another example is using a scene to trigger a light in the bathroom when a motion sensor detects movement. Such a scene is ideal if you need the loo in the middle of the night! Plus, you can set it on a delay to turn off after a set time, say 15 minutes.
You could programme a good morning scene that raises the blinds or curtains in your home and gently turns on your bedroom light to 40%.
Is it easy to activate scenes?
It depends on the scenes you create. For example, if your using a sensor to trigger a scene, you’ll need to test it as carrying around your phone or a scene controller isn’t ideal.
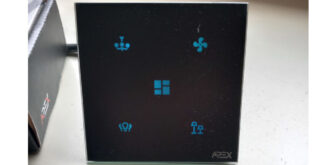
If plan to activate certain scenes, you could use the Fibaro app, as they’ll appear automatically. Another option is a scene controller like the Heatit Z-Push, APEX Crystal switch, or Fibaro The Button.
We’re massive fans of the Z-Push as it’s super easy to programme, battery-powered, and simple to install. The APEX range is another favourite but requires a neutral cable as it’s wired but also means you don’t need to replace batteries.
Either way, with a bit of practice and some thought, you can build and activate scenes that run your home exactly as you want to.
Creating Fibaro block scenes for Home Center 3 and 3 Lite
To get started, you need to sign in to the online portal, exactly as you would if you were updating your hub. Sign in, and select your hub from the list by clicking on the Open button next to the hub you want to modify. Finally, log in to the Configuration Interface.
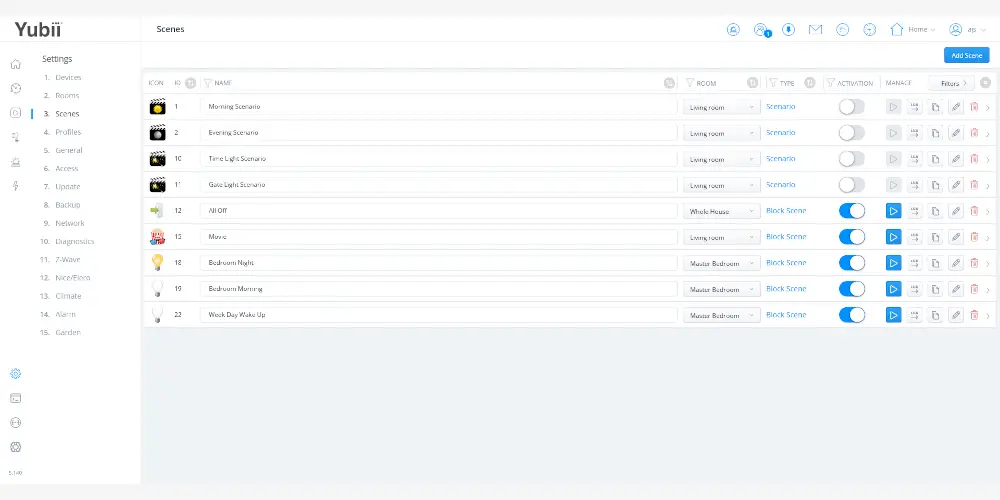
Click the gear icon on the bottom left to access the settings menu. Click on the 3rd option: Scenes. You’ll see several default scenes that Fibaro included during installation.
On the top left, you’ll see a blue “Add Scene” button. Clicking on this launches a pop-up with 3 options: Block Scene, LUA Scene, and Scenario. Again, we’ll be focusing on the first option.
Click on Block Scene. Next, enter the name of your scene. Select the room, icon, the category, and how you’d like the scene to run (if you’re unsure, leave it as auto). Click save to create your scene.
You’ll then be directed to the block scene editor that allows you to build your scene using the different blocks.

What blocks are available?
Start by choosing from the list of available blocks. There are plenty of options depending on what your aim is.
ANY / ALL: allow to combine conditions. After adding, click on the name of this condition to change it between:
- All of these are true: Start the scene if every condition in this frame is true.
- Any of these are true: Start the scene if any condition in this frame is true.
- Delay Set time: All actions in this frame will be delayed by time set (click its name to change delay time).
- Weather Temperature: Checks temperature, choose comparator and value to compare.
- Humidity: Checks humidity, choose comparator and value to compare.
- Wind speed: Checks winds speed, choose comparator and value to compare.
- Weather: Check weather condition, choose is or is not condition and type of the weather.
- Time interval (trigger): Scene runs every given period of time, set starting point and time interval.
- Once (trigger): Scene runs at given time only once.
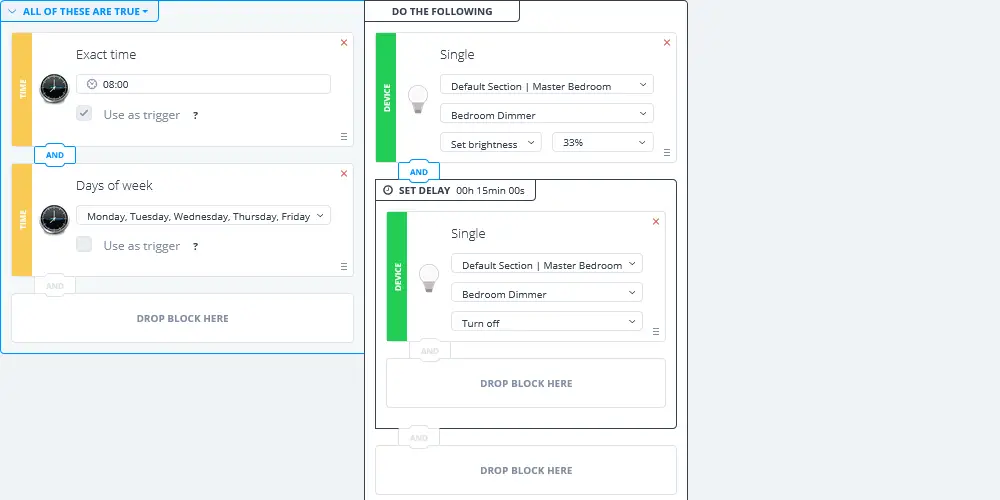
- Days of week (condition): Scene starts only on given days of the week when triggers are met.
- Days of month (condition): Scene starts only on given days of the month when triggers are met.
- Time range (condition): Scene starts only in a given period of time when triggers are met.
- Date range (condition): Scene starts only in a given range of dates (between two specified days of the year) when triggers are met.
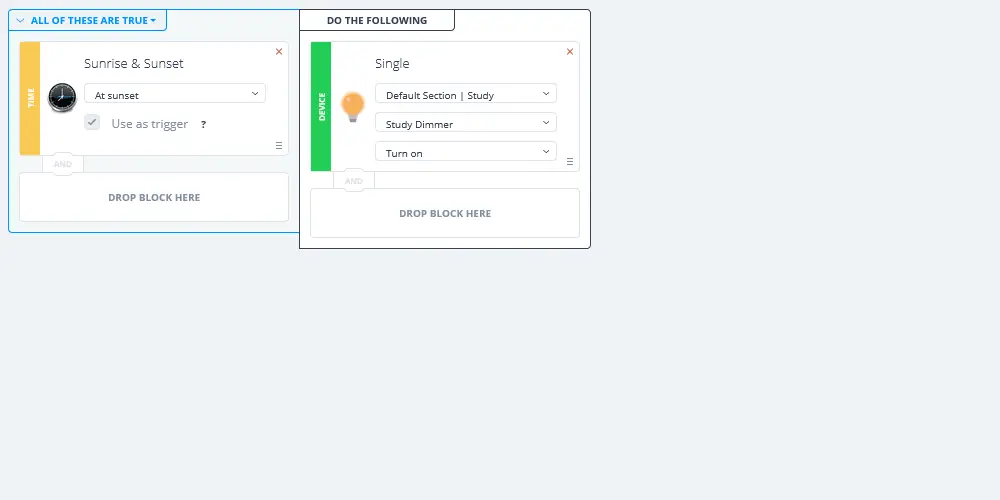
- Sunrise & Sunset: Scene starts depending on sunset/sunrise time for your location (Before sunrise, At sunrise, After sunrise, Before sunset, At sunset, After sunset).
- Exact time: Scene starts at exact time of the day.
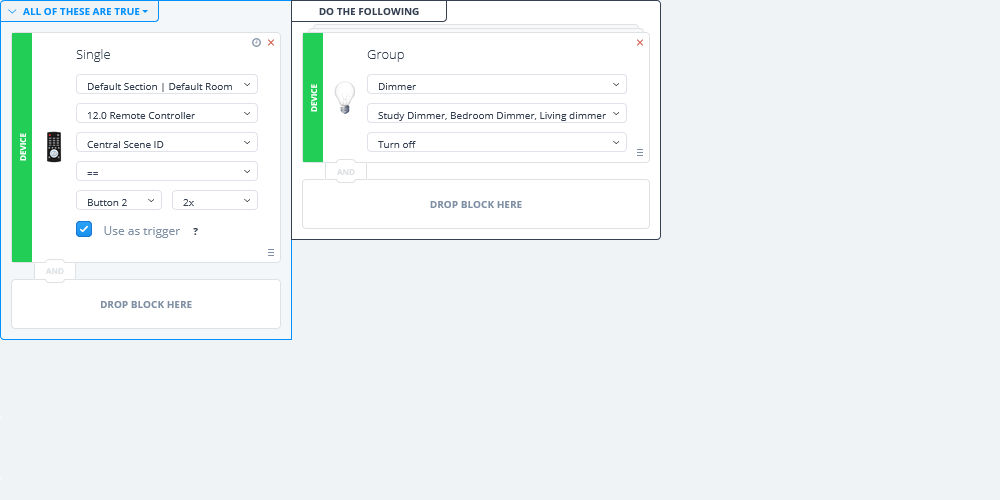
- Device:
- Single action or condition: Choose one of your devices to trigger on a specific state or perform an action.
- Group action: Choose one or more of your devices to perform an action.
- User GPS Location (condition): Scenes runs when user enters/leaves selected location.
- Scene (action) Choose a scene which will run when conditions are met.
- Notification
- E-mail: Send e-mail to the selected user with your content.
- Push: Send standard push notification to the selected user or mobile device with your content.
- Interactive push: Send interactive push notification to the selected mobile device with your content and ability to run scene or action on device directly from the notification.
Panel: You can use panels both as action and as condition
- Alarm (action or condition): Trigger scene for alarm state or arm/disarm an alarm.
- Profiles (action or condition): Trigger scene when profile is activated or activate one of the profiles.
- Variables (action or condition): Trigger scene for global variable value or change value of variable.
- Events (action or condition): Trigger scene when custom event occurs or emit custom event.
- Climate (action or condition): Trigger scene when zone enters specific mode or active mode in the zone.
What are triggers or conditions?
On the left column of the block scene, you’ll see a box for triggers and conditions. When these are met, the software will run the scene and perform actions in the right column. Some blocks are always triggers, some are conditions, and some can be both.
Triggers will activate the scene to check the rest of the conditions and triggers. However, conditions will not activate the scene. But they act as an additional requirement before performing actions.
By default, all All blocks in the left column must be met to start the scene, but you can click the top left corner to change between All of these are true and Any of these are true.
To achieve more complicated logic, use ANY / ALL frames, which can be nested for any kind of trigger/condition relation.
Duration of the condition
Condition blocks for devices can check if the desired value did not change for a specified duration, e.g. motion sensor was not breached for 5 minutes or a door was opened for 15 minutes.
To apply duration to a condition
In the upper right corner of the block click icon. Next, set the duration, and click Apply.
Converting Block Scenes to LUA
If you want more flexibility when building scenes, you can convert Block Scene to Lua Scene in a few clicks. Doing so helps to speed up LUA development, allowing you to tweak scenes even further.
Open the scene builder in the Settings area of the Fibaro Configuration Interface. You’ll see an LUA button with an arrow near the end of the scene row. It’s after a blue button with a play symbol that you can use to activate a scene.
After pressing the LUA button, the scene will be copied and converted to the LUA programming language. From there, you can edit the code in the LUA editor. But that’s another topic for later.
Examples of Fibaro Block Scenes
If all of this sounds a bit out there, here are a few ideas of Fibaro Block Scenes you can try, including some that we’re running with our Home Center 3 Lite and a few from Fibaro. Enjoy!
Turn off all lights
Turn on bedroom light at 8 am weekdays only
Activate “Away” profile when The Button is clicked 2 times

Turn on light when motion detected

Turn light on sunset
In our next article, we’ll look at how to use Block Scenes in your home and what scenes you could create for each room to make life that little bit easier.