Marantz NR1609 7.2 channel AV receiver review
- By: Ashley Saunders | AV receivers
- PUBLISHED: 24th June 2020 | LAST UPDATE: 10th July 2023
Designed using over 60 years of audio-visual knowledge, the Marantz NR1609 Slim 7.2 Channel AV Receiver delivers a fantastic experience for both music and cinema. The NR1609 is available in black and silver.
Don’t be fooled by its slim appearance s the NR1609 offers a fantastic set of features that make it ideal for any home cinema room. Watch all your favourite content in 4K 60Hz with support for Dolby Vision and HDR, as well as built-in picture upscaling.
Each of the 7 amplifier channels delivers 90 watts, allowing you to enjoy 3D sound thanks to the built-in Dolby Atmos, DTS:X and DTS Virtual:X. As a Wi-Fi ready unit, you can stream music from your favourite services and via Bluetooth, Apple AirPlay 2 or the HEOS app.
Enjoy your favourite music around your home thanks to the built-in HEOS technology. You can even enjoy music in the next room using the Zone 2 outputs to power an amp and speakers.
What makes the Marantz NR1609 exciting is the range of control option available, which include a remote, app (for both iOS and Android) and Amazon Alexa Voice Control. With multiple options, controlling your home cinema has never been so easy.
As one of the best 7.2 channel AV receivers currently available, the Marantz NR1609 score 8/10.
Pros
- Slim – half the height of a traditional
- 8 HDMI and multiple analogue inputs
- Amazon Alexa voice control
Cons
- Single HDMI out
- Only 90 watt per channel
Design
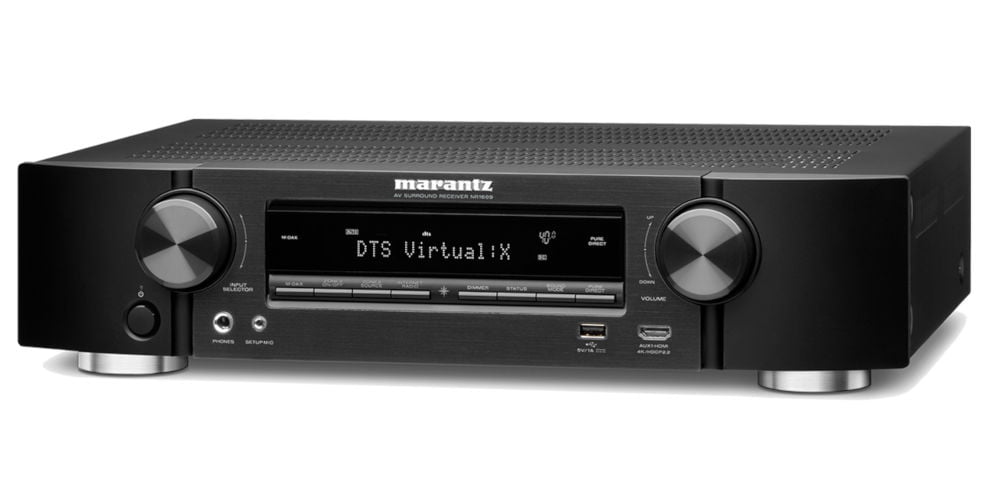
The Marantz NR1609 sport a slim design, which manages to pack plenty of options within a compact size yet it doesn’t feel busy.
At the heart of the front panel is an LCD display which shows real-time information. Below this is a row of buttons which allow control over Zone 2, Internet Radio and the Sound Mode. To the left is a large knob which switches the input source. The other large knob, on the right, adjusts the overall volume.
Below the input selection knob is the power button, a headphone output and set-up microphone input. There are a USB and HDMI inputs under the volume knob, which allow for easy and occasional use. Ideal if you don’t want to rearrange your set-up every time you want to play media via USB.
Moving on the rear. At the top, on each is a slot to connect the two antennas for Bluetooth and Wi-Fi. There is also an IEC power socket, a LAN port, remote control jacks and 2 digital audio inputs. In the centre is 8 HDMI ports (7 inputs, 1 output).
Below this top row are connections for FM and AM antennas, 4 stereo phonos inputs (for CD players and turntables), 3 assignable video phono inputs and 2 AV composite inputs.
There are pre-amp outputs for Zone 2, a second stereo set and 2 sub-woofers. Finally, 7 sets of speaker terminals complete the rear panel and allow connection by both bare wires and banana plugs.
The remove is fairly large with plenty of empty space which improves useability. In addition to the basic control such as volume, power and mute, there are individual buttons for each input source, DSP modes, range of menu control and for the radio function.
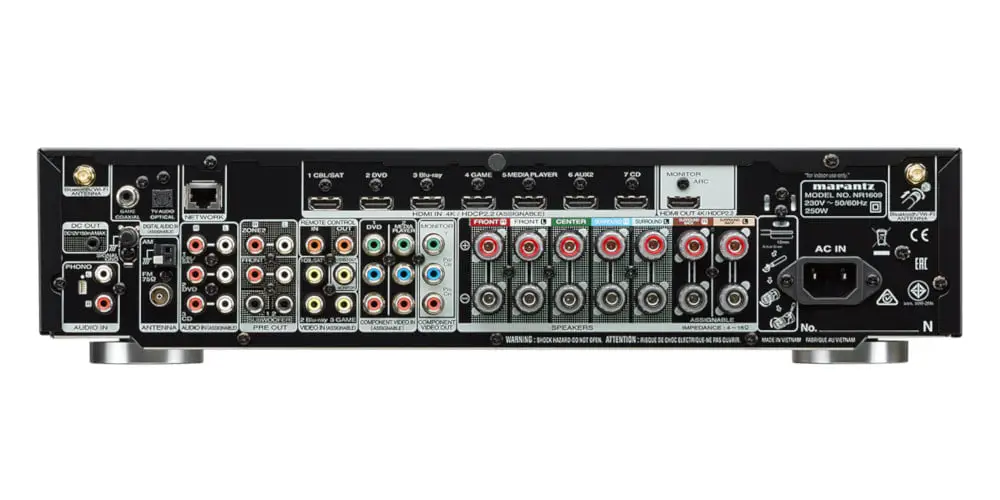
photo by Marantz
Features
Packed full of features, it’s might bore you to tears if we covered the Marantz NR1609 in minute detail. So here is a highlight of the features which makes it different.
In terms of video, the NR1609 features an advanced video processor, which upscales all content to 4K, regardless of the original resolution. Typically, AV receivers only offer 4K pass-through, which while useful doesn’t provide older format with a new lease of life.
Another unique feature is the front HDMI port, which is ideal for occasional use. 7 rear HDMI ports make it easy to connect a range of devices. All of these HDMI ports offer support for an array of formats including HDCP 2.2, 4K Ultra HD 60Hz video, Dolby Vision, and High Dynamic Range (HDR).
On the audio side, the Marantz NR1609 supports several audio formats including Dolby Atmos, DTS:X and DTS Virtual:X. The unit also offers support for high-resolution audio such as ALAC, FLAC and WAV lossless files up to 24-bit/192-kHz. You can enjoy music exactly as the composer intended.
The built-in Bluetooth and Wi-Fi enable you to stream music from your smart devices, AirPlay 2 or the HEOS app. Listen to your favourite music on Spotify, TuneIn, Deezer and more.
In terms of multi-room, you can enjoy music throughout your home thanks to the Zone 2 outputs and built-in HEOS technology. You can even configure the NR1609 to play different music in each zone.
The Marantz NR1609 offers an array of control options including a remote. If you prefer using an app, there is an AVR Remote app for iOS and Android, which allows full control over the unit.
If you’re already be using Amazon Alexa Voice Control for hands-free control around your home, then you’ll be happy to know that you can easily sync the NR1609 with your Alexa.
Setting the NR1609 up
As with any AV receiver, properly setting the Marantz NR1609 takes a few hours.
Connecting devices
First, you’ll want to connect devices and speakers. Depending on the devices you intend on adding, you’ll need to supply the AV cables. For Blu-ray/DVD players, Set-top boxes and game consoles, connect them into the HDMI ports.
If you have a turntable, use the dedicated channel. For CD players and older games console, use the available audio/composite channels. At this point, it’s worth screwing in the antenna (Bluetooth/Wi-Fi/radio etc) or using a LAN cable to your router for Wi-Fi capabilities.
As a flexible unit, the most basic speaker set-up the Marantz NR1609 can handle is 5.1. Of course, you can use it as intended with a 7.1 or 7.2 speaker set-up, depending on your room and budget.
You can connect your home cinema speakers either by screwing bare wires into the speaker terminals or use banana plugs depending on your preferrence.
The final step is to connect your display (TV or projector) to the single ARC HDMI output port.
Optimising your NR1609
With the basic set-up complete, it worth optimising the audio for your speaker et-up and room. To do this, you’ll need to attach the calibration microphone and place it at the main listening position. Next, ensure the room is quiet and run the Audyssey® software.
After a while, this software will have made a series of adjustments and will have optimised your Marantz NR1609 and speaker set-up. If you’re unhappy or want to tweak further, there are plenty of options available.
By this point, you should be ready to enjoy movies, gaming or streaming using online services. So sit back, grabs some snacks and watch your favourite movie!

photo by Marantz
Performance
With only 90 watts per channel, the Marantz NR1609 perform well yet lacks power. If you’re building a small cinema room, then it should be adequate. However, it might struggle in a cinema room with multiple seating rows. Sadly no amount of features makes up for this.
That said, what the Marantz NR1609 excels at is seamlessly switching between various sources. Unlike some AV receiver who only offer HDMI and a few token audio channels, the NR1609 offer a fantastic range of inputs.
It doesn’t matter if you’re streaming music or playing it using a USB memory stick, enjoying a movie or gaming, the Marantz NR1609 handles it with ease. The remote has options for all the input, allowing quick and easy access to a range of devices.
The onboard 4K upscaling means even old films come to life and while many Blu-ray players, for example, have a similar function, many AV Receiver only off 4K pass through. Of course, if you prefer HDR or Hybrid Log-Gamma, you have those options as well.
One way the performance does suffer, even if it’s a minor point is the single HDMI output. It would be nice to have two as then you could run an additional TV and speakers (using Zone 2) in a different part of the home and play the same content.
You can partially solve this issue by using the composite AV output and zone two, however, this method uses phonos and not an 4K HDMI cable, meaning the image quality is likely to suffer.
The onboard audio decoders ensure a cinema-quality sound whether you’re using the basic decoder, Dolby Atmos or DTS:X. Marantz has also considered how to replicate 3D sound, albeit in a smaller space. The built-in DTS Virtual:X handle this quite successfully.
Is the Marantz NR1609 worth buying?
If you’re looking for a compact 7.2 AV receiver when plenty of impressive features, consider the Marantz NR1609 Slim 7.2 Channel AV Receiver.
As with other Marantz AV receivers, there much to like to about the NR1609, including the onboard video upscaling, multiple decoders and a whole host of digital inputs. We especially like the inputs on the front as they allow for quick and pain-free connection.
It does suffer from a lack of power as each of the amplifier channels put out 90 watts. Depending on the size of your cinema room, this shouldn’t be an issue unless you’ve super-sized!
The range of inputs is impressive with a range of digital and analogue ones available. A few worth mentioning are the special turntable input, the Bluetooth and the front USB which allows you to play media directly from a memory stick.
Controlling the Marantz NR1609 is incredibly straight-forward whether you’re using the well-designed remote, the app or using voice control via Amazon Alexa. If you’ve automated your cinema room, these options allow you to seamlessly control the experience from beginning to end.
Overall, if you’re looking for sheer volume output, then this isn’t for you. however, if you don’t need a massive amount of headroom but still want a unit with many fantastic feature and options, then the Marantz NR1609 could be ideal. 8/10