How to add a secondary switch with a Fibaro Dimmer 2

- By: Ashley Saunders | Fibaro
- PUBLISHED: 5th July 2023 | LAST UPDATE: 30th October 2023
Installing a Fibaro Dimmer 2 is pretty straightforward if you’re using a single switch with the bulb. However, using the module in a 2-way lighting circuit might not be as clear. Thankfully, wiring a secondary switch with a Fibaro Dimmer 2 module is easy to understand and apply.
Let’s start with the basics. What do we mean by a 2-way lighting circuit? Simply put, this is when you can control a light using two switches.
You might have a light switch at each end of a staircase, allowing you to switch it on/off from the ground floor or upstairs landing. Using either switch, you can control a light bulb on the landing ceiling.
Another common example of a 2-way lighting circuit is in the hallway. You might have a light switch by the front door and another by the stairs. Both control a light bulb in the hallway, just from different locations.
If you’ve already wired in a light switch or upgraded yours with a Fibaro Dimmer 2, you’ll have the skills and tools to wire two light switches into the circuit.
Most UK lighting circuits use 2-wire with no neutral wire at the switch. So we’ll use that wiring scheme with our examples. Here’s how to add a secondary switch with a Fibaro Dimmer 2.
WARNING: SAFETY FIRST
As you’re dealing with live electrics that could be dangerous, if you’re not comfortable, DO NOT attempt to rewire anything. Instead, hire a good local electrician who can complete the work safely.
Note: To simplify these diagrams, we have not shown the earth cables – but all circuits MUST have the earth cable correctly installed.
We have done our best to indicate where you need to add new cables and how to wire elements together to form a circuit. However, all diagrams are presented as they are, and we assume no liability for inaccuracies.
Standard 2-way lighting circuit
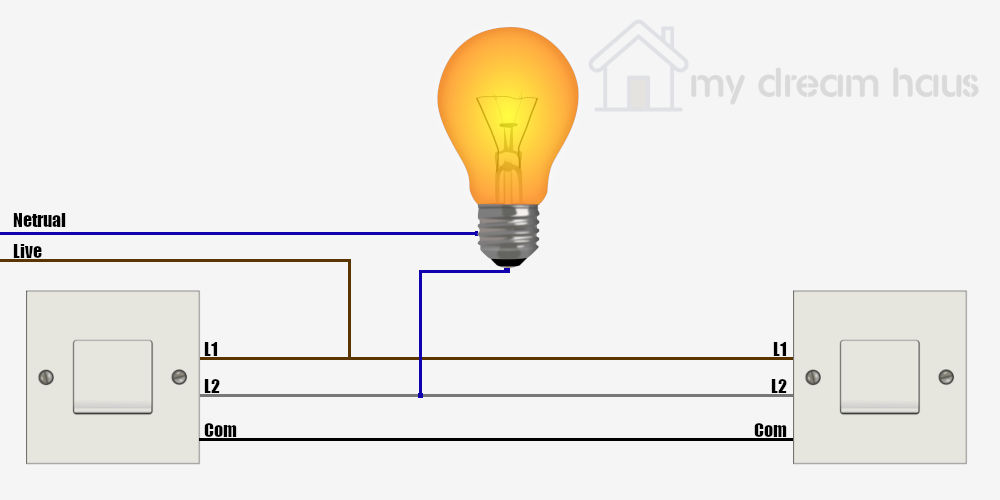
As a pretty standard 2-way lighting circuit, a 2-core cable (brown and blue) is used for the Live and Switched Live between the wall switch and light fitting. A 3-core cable (brown, black, and grey) connects the two wall switches together, meaning either can turn the light ON or OFF.
Typically, we use latching light switches that have an ON position and an OFF position. As the name suggests, these latch in position. So if you switch one of them to ON, it’ll stay on that position until you either click it to OFF or click the other switch to turn the light off.
Fibaro Dimmer 2 Connections
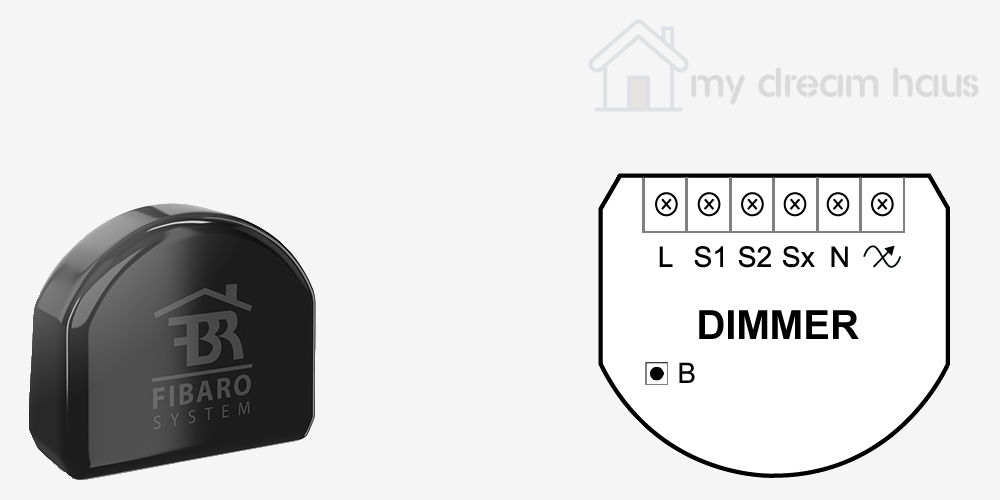
If you look at the Fibaro Dimmer 2 module, you’ll see six terminals, which are:
- L – Live
- S2 – connection to Switch 2
- S1 – connection to Switch 1
- Sx – switch common
- N – Neutral (this is connected to Sx in 2-wire installations)
- ~ (Output) – connected to light or load
If we were to install this with a standard lighting circuit, we’d use L, S1, Sx, N, and ~ terminals to wire the module in. As we only have 2 wires at the switch, we’d wire Sx and N terminals together with a short jumper cable.
We’d recommend wiring one switch with your module to start before trying to connect the second light switch. Otherwise, you might introduce issues that are easy to solve.
What’s the ideal switch to use with the Dimmer 2 module?
After using both latching and momentary switches with our Dimmer 2 modules, we prefer the momentary kind. You might know them as retractive or bell-push. These switches only remain in the ON state when being pressed. When you release the button, they return to the OFF state.
We prefer this type of switch as they allow you to dim your light up or down by holding the button down. You can also double tap them to turn the light on full.
You don’t have to keep holding the button for the light to remain on as the Dimmer 2 module’s software automatically keeps the light on when the button is released.
By default, the Dimmer 2 works with a momentary switch. You can change the settings for it to work with a latching switch. Log on to the Fibaro online portal. Look for the gear icon (settings) on the left hand side. In the settings page, locate the Dimmer 2 module you’d like to adjust.
Click on the arrow at the end of the row to see the advanced configuration options. On this menu, look for the Parameters tab. After clicking on it, you’ll see a list of parameters you can edit.
You want to look for Parameter 20: Switch Type. By default, this option is set to Momentary. Clicking on the Toggle switch label will allow you to use a latching switch with the module. Click Save to make the change.
The type of switch you prefer using is completely up to you, and we’d advise trying both types before making a decision.
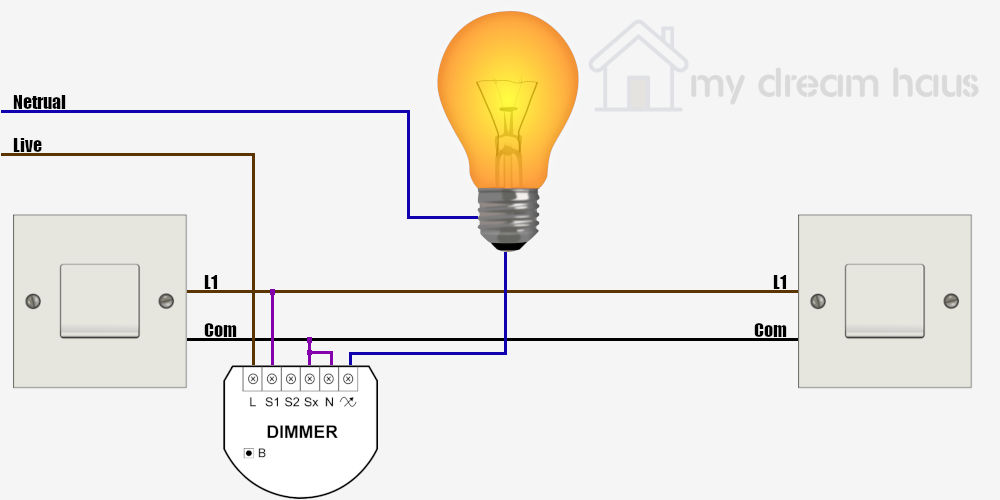
Toggle Switches
If you want to retain your existing standard Toggle switches, we can simply install the module using the following wiring:

Fibaro Dimmer 2 Parameter Setting
Using the online portal, you need to adjust the following parameters:
- 20 – 1 – enables the module to work with a toggle switch (default is 0 for a momentary switch)
- 26 – 0 – keep as default
Momentary Switches
For full On / Off and dimming control, replace your Toggle wall switches with Momentary switches. The wiring is slightly different between the two switches:
Any unused wires from the original 3-Core between the two switches should be safely terminated.
Fibaro Dimmer 2 Parameter Setting
Using the online portal, you need to adjust the following parameters:
- 20 – 0 – default
- 26 – 0 – keep as default
Momentary Switches (using the S2 terminal)
As we’ve already covered, you don’t need to use the S2 terminal on the Dimmer 2 module, but you can wire a second switch using it like so:
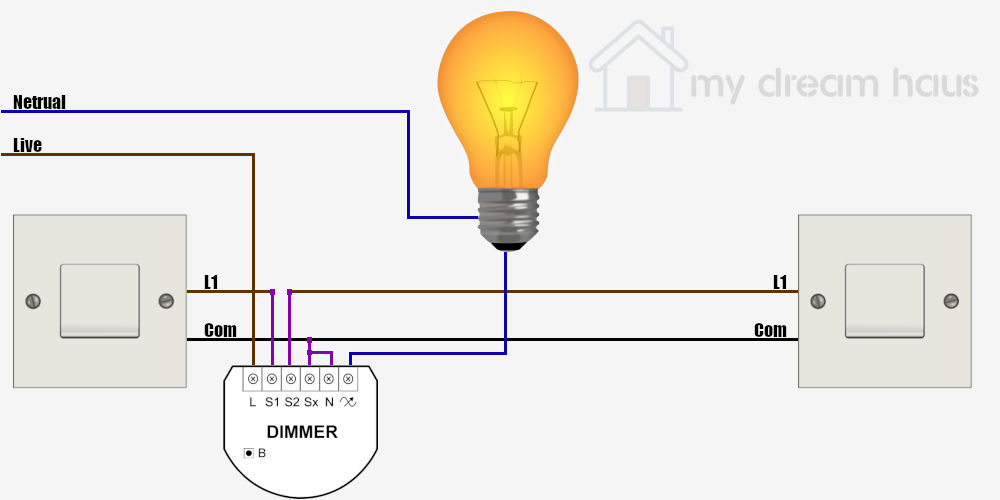
Fibaro Dimmer 2 Parameter Setting
Using the online portal, you need to adjust the following parameters:
- 20 – 0 – default
- 26 – 1 – change to 3-way switch function for S2 enabled
Using a secondary switch with a Fibaro Dimmer 2 module
You can find multiple other ways to use a 2-way lighting circuit with a Fibaro Dimmer 2 module listed in the product manual. The Vesternet knowledge base has a superb article that illustrates more options, including using a Z-Wave wireless switch or second Dimmer 2 module.
If you have a light that could really do with a secondary switch but don’t fancy rewiring, create two block scenes in the online portable to turn the light on and off. Trigger these scenes using a HeatIt Z-Push, which becomes your secondary switch.
Thankfully, adding a secondary switch with a Fibaro Dimmer 2 module is easy as long as you’re comfortable with electrics. If you’re not, hire an electrician.